Well, I took out the work that had already been done on the plumbing and started re-routing everything last night. Then, like ADD girl, got distracted by shoring up the floor beams.
The floor in the bathroom is a pain in the butt. For one thing - it isn't level. Leveling it would require finding the high point in the room and matching everything up to that point. I am talking probably two inches from one side of the room to the other. This is not insignificant.
On top of that the joists have been hacked and notched over the year to install the original bathroom and lighting. So they are full of cracks and holes. Some end out in space - meaning they don't rest on the structural beams at the end walls. Grrr.. It's probably not as bad as it sounds.
So, last night I cut a chunk of one beam out and replaced it. I have a 2x8 to shore up another beam close to the toilet. I think once this is done I can finish up the piping. I hope to do that on Saturday.
More pics soon...
Thursday, January 18, 2007
Wednesday, January 17, 2007
News Roundup No More.. Plus Other Things..
OK, so the news roundup experiment was a bust. While it was fun to post the first few days and include some cool pics like that Russian rocket burning up over Colorado I just don't have the time some days to keep up with it.
The renovation of the bathroom needed some renovating too. The location of the sink was giving me a headache. The drain would have been run through the side of the vanity instead of the bottom which meant the vanity location was very much set, the electrical would have been a pain since there is a pocket door where no receptacles can be mounted, and it just didn't give me the opportunity to do the lighting that I wanted. As is the case with me sometimes it took a little while to make this decision then take out the work that had already been done. I am chomping at the bit to move forward and I will - it's just been a delay. Argh.
OJ Simpson is back in the news again. The chapter of his cancelled book, "If I Did It," that deals with the murders of his (ex?)wife Nicole and her friend Ron Goldman was leaked in Newsweek. It turns out that his "hypothetical scenario" closely mirrors the actual facts of the case.
Here is an excerpt from that article -
After the murders... "Simpson writes that when he regains control of himself, he realizes he is drenched in blood and holding a bloody knife. Both Nicole and Goldman are dead. Simpson heads back to the alley but before getting into the Bronco to flee, strips down to his socks. He rolls his bloody clothes and the knife into a small pile. (That's an important detail. The police never recovered those clothes or the murder weapon, but they did find Simpson's socks—with Nicole's blood on them—at the foot of his bed at his Rockingham estate.) As he nears his house, Simpson sees the limo that will take him to the airport for his Chicago trip. He steals onto his estate via a darkened, hidden path that takes him directly behind the guesthouse where Kato Kaelin is living. Simpson describes how he stumbles into an air conditioner for Kaelin's room, making a terrific racket—just as Kaelin told police he had heard."
I always thought that OJ did it and because of the police screw ups in the case the jury ended up doubting his guilt instead of believing his innocence. These details, especially things that line up with the case like the socks, make me believe he's guilty even more. Too bad he can't be retried.
Here's a link to the Newsweek article -
http://www.msnbc.msn.com/id/16610772/site/newsweek/
Plus another piece from Slate -
http://www.slate.com/id/2157652/
Wednesday, January 10, 2007
Renaissance in a modern world...
"Jack of all trades, master of none, though ofttimes better than master of one".
When you read the whole phrase it's a lot more positive than, "Jack of all trades, master of none!"
My dad was a jack of all trades. His official profession was a draftsman, but he was an inventor, engineer, he liked to write, he was a musician, a woodworker, an artist, a mechanic, a renovator, a gardener, sometimes a cook...
He held 14 US and 16 foreign patents. These were for mostly electro-mechnical devices such as a microfiche sorting and card retrieval machine.
I can remember the frequent jokes about how he would start projects and not finish them. Or about how he would get excited about bowling and get a bowling ball because he was going to get really good at it and then lose interest a few months later... or fishing gear... or...
I don't know if it is scientifically proven that innate curiosity and a propensity to become bored with things once you know you can do them is hereditary, but I guess they might be. Right now I have my bathroom torn apart, I am reading the biography of Joseph Smith, "No Man Knows My History,"I have at least 5 other books either started or waiting in line, I am taking a class in Advanced Materials, I work 40 hours a week, I have a girlfriend, I've got my mom around too, plus cats, and fish... the house projects seem endless... set up my shop, put away my stuff, get the upstairs organized and livable, re-do my mom's shower, fix up my bedroom, and little things - put up the smoke alarms, finish touch-ups on the hallway, and so on... Hrrrmmmmpphhh....
Lots of people throughout my life have become frustrated with me because they think I don't care about them. In a way I feel really good about my relationships right now because they aren't heavy - I don't feel heavy about them. I feel like I do have room to move around and be me and do my thing. I don't understand it when people get frustrated with me for being inattentive. When I say that I mean - I really don't understand it. I feel like I am doing my best to maintain balance in my life and to keep the important things important, but maybe my sense of taking care of things and other people's sense of taking care of things is different.
I related the story about my dad because I tend to do the same things. I check things out that interest me - might spend some time studying them intensely - then I'll move on to something new. I used to think that this was a bad thing because of the way people talked about my dad - how he could never stick to one thing. This is why I have a degree in Aviation Technology - I wanted to follow through with something. I was afraid of spending my life hopping from one thing to the next.
More recently I have started to embrace this part of me that has a relatively short attention span. I am looking for ways to take advantage of wanting to learn a little about everything. For example, what kinds of jobs need these kinds of people? And if I am curious about something I let myself be interested in it. I have decided hopping around is great, not bad.
Doing my bathroom - working with my hands - that has been fun. It's like Legos for adults. I loved Legos when I was kid. I think I could build things all the time. It's neat to figure out and cool when the things you put together work.
Anyway, so when you are interested in everything what happens? Your schedule ends up jam packed. My schedule has always been jam-packed. If it's not one thing it's another. It used to be choir, school, and sports. Now it's renovations, school, taking care of mom, friends, and stuff. I stretch out my days and stay up late and do as much as I can with each day. Then I get cranky when I there is no time left and I am tired every day and feel crappy. Then people get mad at me because I seem inattentive and aloof. So, there are downsides to being a Jack of All Trades.
I know I need to prioritize better. I am guessing that if I were less busy and did more quality things I would probably be happier. I just don't know how to let go of tinkering constantly. It makes me late in the morning and pulls at my attention throughout the day. I'm not sure how to balance my life, but I will work on it, because the way I am relating to my life isn't working so well. I am tired all the time and I realize now too that I am giving people the impression that I don't care about them. I am not sure what to do, but I'll post it when I figure it out.
Tuesday, January 09, 2007
Dern PVC
This is what happened...
Running the PVC drain pipes was one of the first things Rick and I did. If you look at some of the pictures in the older posts you'll see the white pipe fitted into the floor.
Well...
I finished all the way to the toilet this weekend. Only there was one problem. The elbow we got for the toilet flange required a piece of pipe to connect to the flange. Being able to connect it wasn't a big deal. What was a big deal was the fact that the flange would have stuck up about 2" above the surface of the floor. Not good. If you're wondering the flange should be flush with the floor. Otherwise you really do end up with a throne.
AND I had already glued everything together. There was no taking it apart. So I decided to cut the assembly out and re-fit it to get the toilet flange in the range where, when it is glued, it will be level with the floor. (Don't glue it until you know for sure where the floor will be!)
Well, I got some 4" fittings thinking if the flange set down in the pipe then maybe that would work better than the 3" pipe we were using. (The cast iron house drain is 4" so we had to get 4" pipe and reduce it to 3" anyway. I had a lot of 4" pipe left over.) I cut some of the 4" and fit it then discovered I would need to take out more wood from the floor beams. They are in sad enough shape already. That seemed like a bad idea. So I figured I would see if there was a flange for 3" pipe. I went back to the store again the next day and it turns out that all I needed was another different type of elbow and the fitting slipped right down the outside. Phew.
SO I tried fitting the pipe in again last night and ended up with one of the fittings upside down. Yes, and it was glued too. After lots of bad words I gave up for the night. I am back to the drawing board today. I so can't wait to start working on something other than plumbing!
Running the PVC drain pipes was one of the first things Rick and I did. If you look at some of the pictures in the older posts you'll see the white pipe fitted into the floor.
If you haven't run PVC yet it's really easy to do. Just make sure you are ready to glue when you glue because the glue sets in about 30 seconds and there is no ungluing possible.
I finished all the way to the toilet this weekend. Only there was one problem. The elbow we got for the toilet flange required a piece of pipe to connect to the flange. Being able to connect it wasn't a big deal. What was a big deal was the fact that the flange would have stuck up about 2" above the surface of the floor. Not good. If you're wondering the flange should be flush with the floor. Otherwise you really do end up with a throne.
AND I had already glued everything together. There was no taking it apart. So I decided to cut the assembly out and re-fit it to get the toilet flange in the range where, when it is glued, it will be level with the floor. (Don't glue it until you know for sure where the floor will be!)
Well, I got some 4" fittings thinking if the flange set down in the pipe then maybe that would work better than the 3" pipe we were using. (The cast iron house drain is 4" so we had to get 4" pipe and reduce it to 3" anyway. I had a lot of 4" pipe left over.) I cut some of the 4" and fit it then discovered I would need to take out more wood from the floor beams. They are in sad enough shape already. That seemed like a bad idea. So I figured I would see if there was a flange for 3" pipe. I went back to the store again the next day and it turns out that all I needed was another different type of elbow and the fitting slipped right down the outside. Phew.
SO I tried fitting the pipe in again last night and ended up with one of the fittings upside down. Yes, and it was glued too. After lots of bad words I gave up for the night. I am back to the drawing board today. I so can't wait to start working on something other than plumbing!
Monday, January 08, 2007
Sweating Copper? No Sweat....
Tip – Before dismantling your bathroom, even a little bit, turn off the water and the electrical supply.
When I first ripped the floor out of my bathroom and realized that in the process I had both nicked a copper supply line and broken one of the PVC drain lines I thought, “Uh oh, now I have to do plumbing.” Yup, I was a bit intimidated and had more than a few worries about the potential for leaks once I had the floor back in. What if I did it wrong?
When I am facing something new that I don’t completely understand I read about it. Google “soldering copper” or “sweating copper” and you’ll find plenty of articles giving step by step instruction on how to solder copper water supply lines. My Black & Decker book on plumbing shows a guy in his neat flannel button-down tucked into a neat pair of jeans with a neat pair of work boots happily applying his torch to a copper joint. The articles tend to be either about how easy it really is to soldering copper pipe OR about how it’s a mix between art and science with warnings about where you could go wrong –making it seem difficult.
A good online tutorial can be found here:
http://www.rd.com/content/openContent.do?contentId=18276
I also have a Black & Decker book on plumbing that’s been helpful.
http://search.barnesandnoble.com/booksearch/isbnInquiry.asp?z=y&EAN=9781589232013&itm=2
OK, I have a whole library of Black & Decker books, but that’s another story.
So, anyway, right after I had finished tearing out most of my upstairs bathroom my friend Rick (contractor arts mentor) came over and we made the decision to tear up the floor and re-arrange the whole bathroom. Doing this got me past my mental block against tearing out old plumbing. I was now committed to learning about removing and reinstalling both copper supply lines and PVC waste pipes.
Rick showed me how to do a few of the copper joints then let me put some together. It’s actually quite easy – plan a route, cut your pipe, clean the pipe and the fitting, and dry fit the assembly, make adjustments as needed, then solder. Most times it’s easiest to remove the sub-assemblies, take them to your shop, clamp them in a workbench, and solder them there. The big plus is that you can orient the assemblies to make them easier to solder (hint – vertical pipes and fittings are harder than horizontal pipes and fittings). After a while you’ll also start to get a feel for nice places to make a break to put the sub assemblies together. For example, connecting two pieces of pipe with one 90 degree fitting is easy. You can clamp one piece of pipe in the workbench, attach the 90 and the second pipe, and fill both joints (places where the pipe is inserted into the fitting) in one shot. Plus, you don’t have to worry about angles with simple assemblies like these. (Hint – if you do have weird angles and assemblies you can mark them up with a permanent marker numbering each piece of pipe to get the pipes in the right place and the angles lined up correctly.) You can then bring the sub-assemblies back to where you are installing the plumbing and check the fit before soldering everything in place.
Routing the plumbing isn’t hard either. Hot on the left, cold on the right – run the pipes near joists and beams so you can secure them with pipe hangars, and with the supply lines, get them close to where they need to be. Don’t forget to make sure of your routing is below floor level and make sure you leave clearance for any drain pipes! Once the new supply lines are in place you’ll be connecting to the hardware with flexible fittings (with the exception of the tub) which leaves some room for improvisation!
The actual soldering of the joint isn’t so bad either. After cleaning both the inside of the fitting and the outside of the pipe apply flux to both surfaces. Make sure you get a good coating. Insert the pipe into the fitting and make sure it bottoms out. If you have several places you want to join then it’s easier to clean, flux, fit, then solder them all at once.
Un-spool about 12 inches of solder and kink the end at a 90 degree angle with about 2-3 inches sticking out. Strike up your torch and apply the interior bright blue flame to both the fitting and the pipe where it enters the pipe. Move the flame back and forth and try to heat the fitting evenly. The flux will start to sizzle. Touch the solder to the pipe. At first the solder may form a small bead, then the bead will run and some will disappear into the pipe (this is pretty cool to watch). Move the solder all the way around the fitting where the pipe enters the joint. Keep hit on the fitting during this process. The flux will draw the solder into the joint. Once you’ve been all the way around the joint and the solder starts dripping remove the solder and the heat and wipe around the fitting with a rag. This both forces more solder into the joint and cleans up the appearance of the joint (that’s the art part of the deal).
 Some joints will look better than others. Some will have blobs of solder everywhere and on everything. Others will look textbook. My first few were Vincent Van Gogh with drips and lumps and rough spots. With some practice they were looking more like Rembrandt. Vertical fittings are still difficult to make look pretty, but they are functional.
Rick came over this past weekend to check my progress and help out a bit. He thought I had things under control and headed home. On Saturday I wrapped up all of the supply lines and soldered temporary caps in place. With Lucia keeping an eye on things I turned the water supply to the bathroom back on. NO LEAKS! This was my first time sweating copper ever and I had no leaks. You can do it too.
The verdict? To start getting a feel for sweating copper is time consuming, but it’s not that hard and it’s a skill that’s well worth learning – especially if there is a lot of copper pipe in your house. It can probably save hundreds, maybe even thousands of dollars in plumbing costs.
Friday, January 05, 2007
So Tired
I think I am either a night person or otherwise am just always trying to jam my day full, full, full and typically end up shutting off the light somewhere around midnight.
I guess this worked out ok when I was younger. Or maybe not. Hmmmmm... I can fall asleep nearly anywhere.
My battle to stay awake started in High School. I slept through Geometry, ended up with a D, and had to go to summer school (where I got an A in the class). I used to sleep through my classes in college too. Not a problem in a lecture with 250 other students, but definitely noticeable for my major classes. Once, one of my professors woke me up and asked if I'd like to get a drink of water. Another talked to me about natural sleep cycles and how there is a slow down in the afternoon.
I have fallen asleep in meetings. Back when I was in sales I remember a meeting with an important client where I was struggling to stay awake. Another time a coworker and I missed our afternoon flight to visit one of our plants and we ended up getting in to the hotel well after midnight. During the afternoon the next day I was battling to stay awake. I was trying to continue to take notes in a meeting and later on we all got a laugh out of my meaningless scrawl.
I often fall asleep when I am a passenger in a car. The last time I was in the UK I spent nearly the entire drive to one of our customer locations taking a nap. Fortunately I have never nodded off while driving, but there have been times when I was so tired I was afraid that I might.
I guess I notice it more now because I don't want to be drowsy at work - it's hard to accomplish anything when all of your energy is going into staying awake - and I am drowsy pretty often.
Maybe I need to trim down the number of things I am trying to do during the day and make sleep a higher priority. Once I get into a regular habit of going to bed earlier then I can re-evaluate and find out if something like sleep apnea is keeping me from getting fully rested.
Thursday, January 04, 2007
Lucia, the Mighty Jetta, and the Dynamic GTI
How do I get it home?
That is the obvious question I asked myself when it came to the new bathtub, toilet, sink, and vanity. As I stood pondering the tub I wondered whether or not I could jam the box through my trunk and fit it into my car with the seats folded down. That seemed like a long shot. AND could a friend and I even lift the box? So, I asked if Lowe's would deliver. They can and they did. The next day for $75. Not bad. AND it turns out that the tub, which is made out of some sort of reinforced plastic (I think), really isn't very heavy at all.
What wasn't so obvious was getting home things like the cement board, the greenboard, and the plywood. Handling a few 2x4's isn't a big deal. Figuring out how to get a large sheet of plywood back to the house is another story.
My girlfriend Lucia ended up saving the day! She came to the store with me and we bought 1 sheet of 1/2 inch plywood, 1 sheet of 3/4 inch plywood, two sheets of greenboard, 5 2x4's and a 2x6. We took all of that out to the card on a cold and windy afternoon and tied it to my Jetta's roof rack. That isn't been the first time the roof rack has been a huge help to have. We layered the greenboard between the plywood to give the greenboard some stiffness and support and no problems getting it home! (BTW, I recommend a Thule roof rack. That thing is solid! There is no chance of the rack coming off the roof.)
The cement board was another story. To me it seems brittle and I figured it made more sense to put it in the back of Lucia's GTI than to try and strap it to my roof. We picked up 5 1/2 inch thick pieces of Hardibacker and 4 1/4 inch pieces of the same. (The 1/2 is recommended for tiling walls and the 1/4 inch for floors.) The sheets are smaller than regular wallboard sheets which makes them a little bit easier to handle. Still, I crushed Lu's thumb while we were loading the cart and she wandered off to find a band aid while I paid for the backer board.
Lucia has been a super-great help with the house. She has helped with lots of painting, helped me take the tub and dozens of heavy garbage bags down to the curb, went to the store with me to get large building supplies that I can't handle on my own, and been patient and tolerant with the slow progress of my first renovation project. She's also been good about me coming home with tools every other day. :) She's given blood when I smashed her thumb, sweat when we brought tons of stuff up to the bathroom, and probably tears at me spending all my time working on the project. All in all she's a great girlfriend!
Wednesday, January 03, 2007
Bathroom Renovation Pics
Ok, here are some pics of the progress in the bathroom...
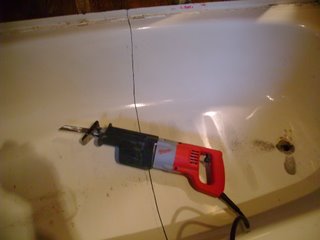
The mighty Sawzall!
The mighty Sawzall!
The bathtub cut in half!
Just the lonely old toilet...
Some shots of the new piping.


Renovations
Well, the first thing you learn when you are doing renovations is that everything takes much longer than you think it will. I have been working on renovating my upstairs bathroom since somewhere around mid-December. Often it seems like what you are looking at doing would be simple – you can imagine the layout of some pipes or fittings in your head – and two hours later you are still soldering. Or taking out this or that won’t be a big deal until you cut through something you shouldn’t have or made a hole here when you wanted one there. Anyway… when I started the project my primary tools were – a 12V Cordless Drill, an 18V Cordless Circular Saw, and an 18V Cordless Jig Saw
The first real power tool I bought was a Milwaukee Sawzall. I went and got it almost immediately after I started working on getting the tile down. If you are doing any kind of demolition this is the tool to have. Sawzall says it all. With this tool I have cut through wall tile, cement board, plywood with nails, copper pipe, PVC, cast iron pipe, and cut a bathtub in half. It’s made so you can start anywhere on almost any surface. Need a hole in the floor? No problem – just don’t cut too deep or you may take out electrical or plumbing that you didn’t want to replace.
The next tool that I got was a drywall screwdriver. This was a Christmas present from my girlfriend’s brother Rick (who has been giving me a crash course in “contractor arts”). A drywall screwdriver is different than using a hand drill to drive screws. It has a clutch mechanism that engages the motor when you press in on the drill bit. SO, speed is controlled with the trigger on the handle and the tool is engage by pressing inward on a screw. It makes life much easier for driving screws and removing them.
I had been thinking about getting a circular saw and why not? I would get to use it on this project. So when Rick and I went out for supplies we grabbed a Dewalt lightweight circular saw. It’s been nice for cutting 2x4’s. Fast and straight!
As Rick and I were working we put my poor little cordless drill the test. I kept running out of battery. We had been trying to cut larger diameter holes in the floor 2x6 support beams – 2 inches for the PVC pipe and ¾ for the copper. It seemed like it took hours. The next tool was a Dewalt 7.8 amp drill. What a difference! With the new Dewalt I started out to ream a ¾ size hole up to one inch and nearly twisted my thumb off my hand! Wow!
To round out the shop I also bought a chop saw so I can now cut PVC quickly without fumbling around too much and a table saw. The table saw had been on my list for a while so that I can make things like radiator covers. I also picked up a small workbench with a clamp oriented so I could solder sections of copper piping.
The bathroom renovation has been going pretty well, but has been time consuming. The first weekend I took out most of the tile around the tub. The second weekend I took out the tub, vanity, toilet, and floor tile. Taking down the drywall was tedious too. It was glued and drilled in place. Other tools required for the job include –
Drilling Hammer or Sledge Hammer
Drywall Axe – Handy, but not not necessary
Masonry Chisel
Floor Chisel
Floor Scraper
Hammer
Screwdrivers
Utility Knife
Channel Lock Pliers
Adjustable Wrench
Pipe Wrench
Dust Pan and Broom
Dust Masks
Eye Protection
Ear Protection
Prybars
Blow Torch
Tube Cutter
Fat Permanent Marker (This is a must have!)
Supplies Bought so Far
½ inch Copper Pipe
Copper Pipe Fittings
Flux
Pipe Cleaners (Emory Cloth and Wire Brush)
Solder
Cement Board for Walls
Cement Board for Floor
Green Board for Areas Not Tiled/Wet
Plywood
(10) 2x4’s
(4) 2x6’s
1 ½ inch PVC Pipe
PVC Pipe Fittings
PVC Cleaner
Tub
Vanity/Sink
Toilet
Various Screws/Nails
Saw Blades
So there you have it. I’ll try and post regularly on the progress and talk about what I am learning. Oh, and I will definitely put up some pics too!
Subscribe to:
Posts (Atom)

